This course will start from zero, so you don't have to install any software for the first lessons. You don't need a crypto-wallet or crypto dev tools; all you need is your browser and basic JavaScript know-how.
Note: If you don't know JavaScript yet, because you just started learning how to program, or you only know other programming languages, you can try FreeCodeCamp, which offers good JavaScript courses for free!
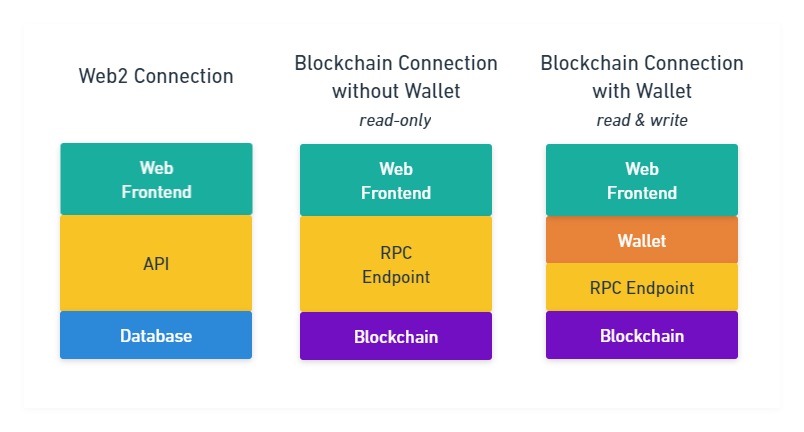
In Web2, you know how to load your data from a server into a frontend. You connect to a backend with an HTTP API, which gets data from a database.
The same is true for Web3. If you don't have a crypto-wallet, you need an HTTP API to connect to a blockchain network because these networks use a protocol your browser doesn't understand. This API is called an remote procedure call endpoint, or RPC for short. This RPC accepts requests from a browser over HTTP and leads them to a blockchain network. You can only read data from the blockchain with this connection method.
If you have a crypto-wallet, you can use it in JavaScript with a browser extension. In the case of
Ethereum, the extension will add a global ethereum object into the frontend. With
this object you can use your wallet in your frontend. You can use this connection method to read
and write data to the blockchain, like sending transactions.
If you installed a crypto-wallet browser extension, it will connect to the blockchain network over an RPC, so the browser doesn't have to use the RPC directly. It will also take care of tasks like signing, and key management.
In Figure 1, you can see the different types of connections—Web2 and Web3 with and without a crypto-wallet.
In this course, you will start with the read-only connection methods.
Ethers.js is software that helps with connecting to the Ethereum network. You don't have to care if you connect directly over a RPC or use a browser extension when using Ethers.js. After you start any connection, the functions you call are the same.
Figure 2 shows how Ethers.js fits between your frontend and the Ethereum network. (The image is not 100% true, because Ethers.js comes with an integrated crypto-wallet, but we won't use it in the first part of this course.)

Ethers.js is an ECMAScript module on the NPM package registry. This means, you can
import it directly in the browser with the unpkg CDN.
import {ethers} from "//unpkg.com/ethers@5.5.1/dist/ethers.esm.min.js
You have to create a provider object to connect to the Ethereum network. Providers are the abstraction Ethers.js uses to normalize RPC use.
You can create such an provider by calling the getDefaultProvider method of the
ethers object you imported before.
Note: This tutorial features a code editor. Here you can write JavaScript code and run it with the press of a button. The Ethers.js library is imported for you and you can useawaitfor asynchronous requests. It also has a
The first example is already written to show you how the editor works. Just press the Execute-button and check the output.
Try it yourself!
To read data from the Etherum network, you can call the getBlock method of the
ethers object. It returns a promise that resolves to an object that has the block's
data, so you need to await it. After you got the block, you can look at its data with
the print function.
const block = await provider.getBlock() print(block)
If it worked, you see the block data in the output. This data is all blockchain-specific and doesn't tell us anything interesting yet. At least, you see that the connection worked, and you read data from it!
Ethers.js comes pre-configured with a shared RPC you can use for free to read data from the blockchain. This RPC has a request limit, so it can happen that you don't get a response if you send too many requests. But for this course, it should be enough.
In this lesson, you learned how Web2 and Web3 backends are different, while both use HTTP APIs. We call these APIs RPCs in Web3 because they allow us to remotely call procedures of a blockchain network.
You also learned how to use a blockchain network with the help of Ethers.js. You didn't have to install anything, just call a few methods and see what happens.
In the next lesson you will learn how to read address data.